February 27, 2013
Flashback beauty


{Model: Anita / Makeup by Maria Lee / Behind the lens: Maria Lee & Jason Lee}
These photos really are a flashback for me. They were taken aaaages ago, (almost 5 years ago... wow how time flies!), and it just goes to show that cameras can capture not only special moments & memories, but also timeless beauty and wonderful personalities through the lens.
I know the lighting and photography is very very amateur, but digging up these images has really reminded and inspired me to not give up on what I love doing, keep practicing and aspire to keep improving. Isn't she simply gorgeous?

X
February 26, 2013
Quick, fire, smokey eye!
Excuse the candid camera phone moment!

No no, I didn't wear smokey eye makeup to my day job today...as if :P But I gathered, since I have been on a major makeup hiatus for the last year (and a bit more), I'm going to re-organise/cull/re-juvenate my makeup kit, in the hopes that weekly makeup posts will amp up the practice (and profile) again! Sorry about the flyaway hairs on my face in these pics...the pics were taken in a rush on my camera phone! I promise the quality will get better in future posts!
Products used for a quick smokey eye look:
Face & cheeks
- NARS Sheer glow foundation in "Barcelona"/Medium4
- MAC Select cover-up concealer in NC35
- MAC Select Moisture cover concealer in NW25
- MAC Studio fix powder in NC40
- NARS "Laguna" bronzer/ "Orgasm" blush
Eyes & brows
- MAC Fluidline in "Little Black Bow" (ltd ed.) as base
- MAC Round Midnight eyeshadow (ltd ed.) on lid
- MAC Tete-a-tint eyeshadow in crease
- Rimmel "Exaggerate" waterproof eyeliner in #261 "noir"
- MAC mascara in Extended Play Lash in "Endlessly Black"
Lips
- Napoleon Lipstick in "Electra"
February 25, 2013
Polka Dots for Gents
Unless you've been living under a rock, you may have noticed that the male population around us are becoming more into their appearance, entering into the metro-sexual realm more than ever.
The polka dot trend is always fun for girls**, but what about for the boys that want to look a bit more dapper?
 Guys are increasingly lifting their game in the style stakes, and although the retail options for guys aren't massively great in the southern hemisphere, I think a bit of DIY action can always help the situation.
Next time you go out with your male friend, how about a bit of matchy-matchy action? :)
 **Did ya see WhoWhatWear's commentary?
p.s. All pocket squares in this post were DIY using Tessuti fabrics.
If you want to know where the blazers in this post were from:
X
Polka dot pocket squares
Next time you go out with your male friend, how about a bit of matchy-matchy action? :)
p.s. All pocket squares in this post were DIY using Tessuti fabrics.
If you want to know where the blazers in this post were from:
- Camel Blazer - Barkers (NZ label)
- Dark Navy pinstripe Blazer - Zara
- Light blue casual Blazer - Zara (old)
X
February 24, 2013
Good Ol' Fashioned Piggies in a Blankie
Contrary to my previous posts, if there was a snack choice between savoury or sweet... I would head for the savoury. Although these are glorified mini sausages...how cute are they? Let's get back to baking basics and try this out, as it is way too easy to make, and also too easy to eat.
Piggies in a blanket recipe
{adapted from Nigella's recipe in her Nigella Bites cookbook*}Ingredients
- 400gm self-raising flour
- 50-60gm grated cheddar cheese
- 1 heaped teaspoon of salt
- 250ml full fat milk
- 3 tablespoon vege oil
- 1 egg
- 4-5 preserved chillies/jalapenos, finely chopped
- 50 cocktail sausauges (more or less, depending on how big your piggy babies are)
- Flour for dusting, Egg/milk for a wash and Nigella seeds for sprinkling
- Preheat oven to 220deg celcius
- Combine flour, cheese and salt in a bowl and fork these ingredients together
- Measure out the milk, and whisk in the egg and oil
- Pour the liquid mixture into the flour mixture and combine into a dough (add milk or flour as needed, if your dough is too damp or too dry). Sprinkle in your chopped chillies and combine into the dough.
- Roll out the dough onto a floured surface, relatively thin (depending if you want your piggies in a blanket or a duvet) rough oblong shape. Slice out 4cm x 8cm wide oblongs for wrapping (I did what Nigella did, and sliced the oblongs out as I wrapped each piggy).
- Brush on some egg wash on each wrapped piggy and sprinkle with some Nigella seeds. Pop in the oven to bake for 12-15 minutes!
- Eat hot out of the oven or cold with your favourite sauce!
Easy peasy lemon squeezy!
X
February 21, 2013
Obsessed with Chevron
If you don't know me personally, you probably won't know that there is one print I'm obsessed with. There is still the odd safari print, leopard, tiger & zebra that catches my eye but Chevron always wins.
I'm not sure what it is, but this zigzag pattern has somehow weaseled its way in and adorns my everyday life in one way or another. Look at my office mug, ipad mini case & couch cushions just as an example!
 So it was probably no surprise to some, that the chevron pattern made its way into our wedding because of my influence (hehe).

Here are just some Chevron snippets from our wedding, photographed by the oh-so-awesome; Coralee & Alex !


 ...and my fave :)


X
I'm not sure what it is, but this zigzag pattern has somehow weaseled its way in and adorns my everyday life in one way or another. Look at my office mug, ipad mini case & couch cushions just as an example!
Here are just some Chevron snippets from our wedding, photographed by the oh-so-awesome; Coralee & Alex !
{Am delighted that Rachael Made From Scratch used this photo as one of her website thumbnails... we did our own wedding stationary :)}
X
February 18, 2013
Meringue-kissed Strawberries
Have you ever been stuck for dessert ideas? Or ran out of time to think about dessert for your guests? Here's a simple little dessert that only has 3 ingredients and can be so fun to whip up!
 If you follow the general rule of 50gm of caster sugar per egg, you should be fine. Whip up your basic meringue* and dip your strawberries into the meringue mixture. The more messily dipped the better because once you bring out the blow torch, this will highlight the dairy-whipped look for your strawberries! Use a kitchen blow torch to effectively shade and caramelise your meringue, have fun :)


 {Dammit... couldn't get a cool flame pic!}

 I made way too much meringue for one chip of strawberries in this post (3 egg whites worth...whoops). So....if you have left over meringue:


*Tips for a good meringue:
Follow my blog with Bloglovin
- Egg whites
- Caster Sugar
- Strawberries
 If you follow the general rule of 50gm of caster sugar per egg, you should be fine. Whip up your basic meringue* and dip your strawberries into the meringue mixture. The more messily dipped the better because once you bring out the blow torch, this will highlight the dairy-whipped look for your strawberries! Use a kitchen blow torch to effectively shade and caramelise your meringue, have fun :)

 {Dammit... couldn't get a cool flame pic!}

- Preheat your oven to 150degrees Celsius
- Spoon small spoonfuls to make little mounds on a baking sheet (or just simply pipe out your mixture)
- Stick them in the oven and quickly turn the oven temp down to 100degrees.
- Leave the meringue in there to bake for 1.5 hours or until the meringues are crisp and sound hollow when you pick them up.
- Turn the oven off and let the meringue babies cool in there while you entertain your guests!


*Tips for a good meringue:
- Make sure you're not doing this on a super humid day,otherwise your meringue will "weep"
- Ensure your whisk and bowl is free of grease and water before whipping up your egg whites. If you're not sure whether this is the case, then wipe your equipment with a bit of lemon juice and a paper towel
- Be patient with spooning the sugar into the whisked egg white! Do it tablespoon by tablespoon after each one has dissolved into the stiff eggwhite!
- If you like your final meringue a bit stiffer, add a small pinch of salt or cream of tartar whilst whipping :)
Follow my blog with Bloglovin
February 17, 2013
Luscious locks
Beautiful Hair.... I die for it!
Kate Beckinsale's luscious locks are just too good to be true.

With extensions or not, it's still nice to dream of attaining locks that are strong and voluminous :)
I've been taking some hair, nails & skin multi vitamin supplements for the past 6 months, in the hopes of some shiny peace of hair heaven myself. Whilst it helped to grow my hair long for my wedding, it hasn't quite reached that voluminous dream state.


 How do you revitalise and feed your locks? Regular mask treatments? Krill Oil? Argan Oil? Eggwhites?
I would love to know!
X
Kate Beckinsale's luscious locks are just too good to be true.
With extensions or not, it's still nice to dream of attaining locks that are strong and voluminous :)
I've been taking some hair, nails & skin multi vitamin supplements for the past 6 months, in the hopes of some shiny peace of hair heaven myself. Whilst it helped to grow my hair long for my wedding, it hasn't quite reached that voluminous dream state.
I would love to know!
X
February 15, 2013
Salted Caramel Milkshake goodness...
I must admit I'm not a massive milkshake fan. Mr Lee loves them. If it's an option on a menu, he'll take it in a heart beat, doesn't matter if it's for breakfast, lunch or dinner! Actually come to think of it, almost every boy I know loves milk in any form...What is it with boys and milk?
There's always the classic flavours; chocolate, caramel, banana and strawberry. But to entice me to want one I love seeing the sight of unusual and more-ish flavours.
A few months ago we tried to get a lunch spot at Reuben Hills here in Sydney, but there was no dice...the wait for a table of 6 on a Sunday was at least an hour! Even though we found another lunch spot, I couldn't help myself, and once lunch finished, I had to go back to Reuben Hills and try their salted caramel milkshake.
I die for anything salted caramel. Having that flavour in this milkshake, really did hit the spot. Surely this is easy to replicate at home right?


Mine doesn't quite taste the same as Reuben Hill's, but I still love it...I'm licking the spoon that spooned out the caramel sauce, as I type. So easy, so quick, TRY ... THIS...NOW!
Rim a glass (or bottle) with a good helping of the salted caramel sauce by tipping your glass horizontally, place small spoonfuls of sauce at the edge of the glass, tip the glass back upright and rotate it in your hand until the goopy gloriousness smothers around the glass the way you like it. Pour in your blended milkshake mixture ...and BOOM!

*Salted caramel sauce recipe I used was from the lovely Nigella Lawson.
X
There's always the classic flavours; chocolate, caramel, banana and strawberry. But to entice me to want one I love seeing the sight of unusual and more-ish flavours.
A few months ago we tried to get a lunch spot at Reuben Hills here in Sydney, but there was no dice...the wait for a table of 6 on a Sunday was at least an hour! Even though we found another lunch spot, I couldn't help myself, and once lunch finished, I had to go back to Reuben Hills and try their salted caramel milkshake.
I die for anything salted caramel. Having that flavour in this milkshake, really did hit the spot. Surely this is easy to replicate at home right?
Salted caramel milkshakes
Whiz the following with a stick blender:
- 3 dessert spoonfuls of salted caramel sauce*
- 1/2 cup milk (light/whole/whatever you like)
- 2-3 scoops of vanilla ice-cream
Rim a glass (or bottle) with a good helping of the salted caramel sauce by tipping your glass horizontally, place small spoonfuls of sauce at the edge of the glass, tip the glass back upright and rotate it in your hand until the goopy gloriousness smothers around the glass the way you like it. Pour in your blended milkshake mixture ...and BOOM!
X
February 14, 2013
Don't forget the furry ones!
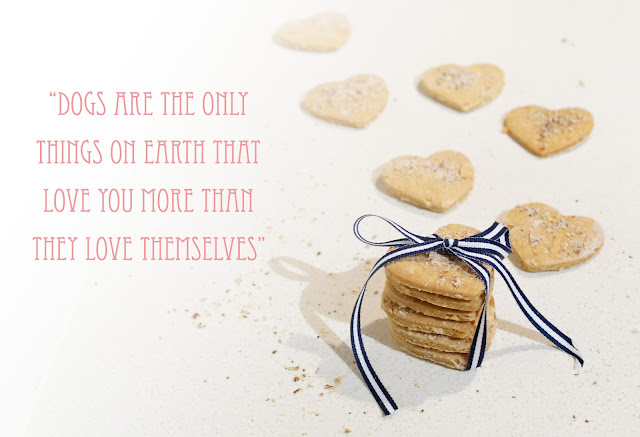
 Whilst all you lovers, likers, Valentine's day loathers spend this day with your partners, girlfriends, boyfriends and friends, don't forget your beloved lil furry ones. Those animals that love you oh-so-unconditionally!
I wish I could still bake for my Snoopy-pie (RIP), and while I wait for our furry family member to arrive in the future, I'm baking for my friends' little loved ones. The recipe is SO EASY and if your animals love peanut butter, they...are...going...to...go...BONKERS!
Peanut butter treats recipe
- 3/4 cup of plain flour (or whole wheat flour)
- 1/4 cup of rolled oats
- 1 1/2 tsp of baking powder
- 1/2 cup of hot water
- 1/2 cup of organic unsalted smooth peanut butter
- Almond Meal for sprinkling
- Preheat oven to 180 degrees Celsius
- Combine the flour, rolled oats and baking powder. In a separate bowl, mix the hot water and peanut butter together until a paste is formed. Combine the peanut butter mix with the dry ingredients until you get a dough.
- Roll out to 1/4" thick and cut out with whatever cookie cutter shape you like!
- Sprinkle with a little Almond Meal and bake in the oven for about 15 minutes.
I'm not so sure whether your cats will like these, or your birds or your bunnies, but I hope you find inspiration to give a lil wholesome hand-made love to them in other ways!
February 12, 2013
Turmeric tea for your funny (poochy) tummy
Ok, so there are times when you don't always feel pretty. One of those times are when your insides are feeling worse for wear. I love food like no other, but when I turned 25, a lil thing called bloat came along. Eating whatever foods I wanted sometimes later turned into a sore and squeamish tummy... i.e. poochy tummy, indigestion, stress tummy, need-to-lay-down-cos-I-feel-like-I'm-going-to-die tummy, etc etc you get it. The sore tummies that I saw my mum experience at times when I was young, (but never understood), soon became a reality for myself!
So then I put on my "Dr Mia" hat, and did a whole lot of self diagnosing by Googling the symptoms (it never is a totally good idea is it?), carb cutting, lactose reducing,testing different kinds of artisanal breads etc etc. I never saw an actual doctor or nutritionist about this (too scared, procrastinated...the usual), but I soon came to realise that after talking to many girlfriends and girl workmates, I'm not alone in this. Hey you dudes out there, it's not a girl fad! Allergies and intolerance to certain foods does happen to us women as we get older. For me, I eventually found that if I take things in moderation, like switching to soy lattes, eating foods with low to no preservatives, and taking up more exercise, any possible tummy aches are under control.
 When Mr Lee and I were mini-mooning (lol...I mean mini-honeymooning) in Bali, we visited a coffee farm that had a very knowledgeable tour guide (smiliest guy on earth might I add!). Whilst educating us about coffee berries, he also showed us all the possibilities that other organic plants & herbs could offer and informed me that all women should drink Turmeric tea.
So then I put on my "Dr Mia" hat, and did a whole lot of self diagnosing by Googling the symptoms (it never is a totally good idea is it?), carb cutting, lactose reducing,testing different kinds of artisanal breads etc etc. I never saw an actual doctor or nutritionist about this (too scared, procrastinated...the usual), but I soon came to realise that after talking to many girlfriends and girl workmates, I'm not alone in this. Hey you dudes out there, it's not a girl fad! Allergies and intolerance to certain foods does happen to us women as we get older. For me, I eventually found that if I take things in moderation, like switching to soy lattes, eating foods with low to no preservatives, and taking up more exercise, any possible tummy aches are under control.

February 09, 2013
Ooh la la Granita!
Hey peeps! We finally got a break from the horrendous rain that traveled down from QLD, and welcomed a "just right" bit of summery heat this week in Sydney. To cool off in such weather, I usually love me some "Calippo" goodness from the local dairy (that's a mini-mart or 7/11 or tuck shop to you Aussies ;) )... and I also love me some gelato.
But sometimes something that is creamy AND refreshing just hits the spot. So instead of running to get a "Splice", I thought I'd try make this ...
 This takes 4 hours to freeze up, but if you want something homemade, it really only takes 10 -15 mins to whizz up and requires no churning so you don't have to think about it whilst its in the freezer. Mmmm creamy, summery strawberry goodness. Click here for the recipe via Giada de Laurentis from the Food Network
It can be such a pretty and easy entertaining dessert for a dinner party too! Presentation is simple. Just flake it up with a fork, scoop into a margarita glass like I did or to have smaller portions, try serving in old fashioned champagne glasses or beautiful Turkish glass cups.
Are you lactose intolerant or have lactose intolerant guests? Don't fret! Omit the marscapone and add a 3/4 cup of some other berry like raspberries. OR...
Try this non-lactose Granita! Refreshing & delish! It's even better after I threw in a shot of barcardi* in the mix :)

Recipe via What Katie Ate here
Enjoy peeps! Happy weekend!
 {can anyone spot me (i.e. my legs) in this last pic? HAHA}
* adding a shot (or two) of Bacardi white rum will make your granita a lil slushier...ah well ...you just have to gobble it quick :)
{can anyone spot me (i.e. my legs) in this last pic? HAHA}
* adding a shot (or two) of Bacardi white rum will make your granita a lil slushier...ah well ...you just have to gobble it quick :)
But sometimes something that is creamy AND refreshing just hits the spot. So instead of running to get a "Splice", I thought I'd try make this ...

It can be such a pretty and easy entertaining dessert for a dinner party too! Presentation is simple. Just flake it up with a fork, scoop into a margarita glass like I did or to have smaller portions, try serving in old fashioned champagne glasses or beautiful Turkish glass cups.
Are you lactose intolerant or have lactose intolerant guests? Don't fret! Omit the marscapone and add a 3/4 cup of some other berry like raspberries. OR...
Try this non-lactose Granita! Refreshing & delish! It's even better after I threw in a shot of barcardi* in the mix :)

Recipe via What Katie Ate here
Enjoy peeps! Happy weekend!
 {can anyone spot me (i.e. my legs) in this last pic? HAHA}
February 05, 2013
DIY Wedding Arm Candy
I have no shame in declaring that I love all things weddings. In fact, if you say the word "wedding" or "bride", my ears will perk up in a second!
When it came time for me to start wedding planning, I was all about research research research and of course some DIY DIY DIY! Mr Lee and I got married last November and one of the things I spent a long time searching, umm-ing and ahh-ing over, were beautiful accessories. There are a GAZILLION amazing options out there, but not a lot that caught my eye for something unique ... and at an affordable price.
Having gone a bit over budget on the dress (whoopsy hehe), I still couldn't let go of the fact that I wanted some arm candy...something that was blingy, yet girly and whimsical.
Hours and hours spent online later... I decided to visit Tessuti Fabrics here in Sydney for some inspiration. They have heaps of swarovski crystal and also lace motifs. One motif that caught my eye (and fit my wrist...and my budget) for a bracelet idea was this one:

From there, I had a light bulb moment, bought the motif and some additional goodies, and did the following...
When it came time for me to start wedding planning, I was all about research research research and of course some DIY DIY DIY! Mr Lee and I got married last November and one of the things I spent a long time searching, umm-ing and ahh-ing over, were beautiful accessories. There are a GAZILLION amazing options out there, but not a lot that caught my eye for something unique ... and at an affordable price.
Having gone a bit over budget on the dress (whoopsy hehe), I still couldn't let go of the fact that I wanted some arm candy...something that was blingy, yet girly and whimsical.
Hours and hours spent online later... I decided to visit Tessuti Fabrics here in Sydney for some inspiration. They have heaps of swarovski crystal and also lace motifs. One motif that caught my eye (and fit my wrist...and my budget) for a bracelet idea was this one:
February 04, 2013
Roses are Red... Violets are blue...
So I thought what a great way to start my blog... in tribute to that wonderful lil thing that makes the world go around?
Showing appreciation for your loved ones should of course not be limited to Valentine's day, but its always a positive reminder to be thankful and to let all your loved ones know how happy they make you feel.
But it also doesn't necessarily mean feeling the need to use V day as a reason to go crazy extravagant on gift giving. How about this DIY idea?

Subscribe to:
Posts (Atom)


