March 31, 2013
Foccacia bread two ways - Traditional & Decadent

For all you peeps that observe the Easter holidays, I hope you all had a great 4-day weekend, I certainly needed the break, and still relishing the idea of having the Monday off.
Judging from all my previous posts, you'd think all I like is sweet stuff, when in reality, when I snack, I tend towards the savoury! Chips, popcorn, soy crisps, olives, crusty bread with camembert.... bring it ON! Last year though, I noticed a slight correlation between stomach aches and after eating a hefty breakfast of my fave toast+vegemite+cold butter combo. I eliminated the vegemite and cold butter combo, and then later wondered if it was the bread I was eating. I culled out bread altogether for a couple of weeks, when I tried out the James Duigan clean and lean diet and noticed no stomach aches, so this drove me to do some tests of elimination.
After trialing with many bread types such as Kamut bread, wholegrain/rye/the lot, gluten free, and preservative free... I soon realised that the bread we would normally reach for, was loaded with preservatives, and thus, led to my upset tummies. These days, I stick to breads that are either preservative free or with as little unnatural ingredients as possible. It's weird...but it's only since I've gotten older that I've paid more careful attention to all the chemical ingredients that are in our food... the less of it the better I think. So in an effort to take control of what goes into our diets at home (and eating in a more natural way), I tried my hand at making my own bread... in a tasty way!


I followed Lorraine Pascale's recipe here, and added an additional flavour that was a bit more decadent. I'm sure you can change up the size of this slab and make mini Focaccias, or how about a Parmessan and Chilli flakes Focaccia? That's going to be my next one!
Serve with your fave cheeses and cold cuts or try with smoked salmon and a dollop of creme fraiche mixed with creamed horseradish. Or just simply eat with a drizzle of olive oil... crunchy outside with a pillowy light centre within :)

I ate a couple of pieces late last night after it came out of the oven... no stomach bloats or aches to report in the morning :) If you're ever skeptical about what goes in your bought breads...why not try making it yourself?
X
Judging from all my previous posts, you'd think all I like is sweet stuff, when in reality, when I snack, I tend towards the savoury! Chips, popcorn, soy crisps, olives, crusty bread with camembert.... bring it ON! Last year though, I noticed a slight correlation between stomach aches and after eating a hefty breakfast of my fave toast+vegemite+cold butter combo. I eliminated the vegemite and cold butter combo, and then later wondered if it was the bread I was eating. I culled out bread altogether for a couple of weeks, when I tried out the James Duigan clean and lean diet and noticed no stomach aches, so this drove me to do some tests of elimination.
After trialing with many bread types such as Kamut bread, wholegrain/rye/the lot, gluten free, and preservative free... I soon realised that the bread we would normally reach for, was loaded with preservatives, and thus, led to my upset tummies. These days, I stick to breads that are either preservative free or with as little unnatural ingredients as possible. It's weird...but it's only since I've gotten older that I've paid more careful attention to all the chemical ingredients that are in our food... the less of it the better I think. So in an effort to take control of what goes into our diets at home (and eating in a more natural way), I tried my hand at making my own bread... in a tasty way!
Foccacia bread two ways;
Rosemary with Sea salt and,
Thyme with Truffle salt


I followed Lorraine Pascale's recipe here, and added an additional flavour that was a bit more decadent. I'm sure you can change up the size of this slab and make mini Focaccias, or how about a Parmessan and Chilli flakes Focaccia? That's going to be my next one!
Serve with your fave cheeses and cold cuts or try with smoked salmon and a dollop of creme fraiche mixed with creamed horseradish. Or just simply eat with a drizzle of olive oil... crunchy outside with a pillowy light centre within :)

I ate a couple of pieces late last night after it came out of the oven... no stomach bloats or aches to report in the morning :) If you're ever skeptical about what goes in your bought breads...why not try making it yourself?
X
March 25, 2013
Splurge or Curb - My Wedding shoes
When it comes to fashion and style, there's no doubt that I am a known shoes & accessories obsessor, magazine hoarder, fashion blog follower, celebrity admirer, and red carpet watcher. I often wonder about the high-end life, wondering if it's really THAT fabulous. This is probably why I have an unhealthy addiction to the "Real Housewives of Beverly Hills" show (among many other E! shows).
When it comes down to going through with purchasing those high-end items that I have lusted after, either from a mag or a blog.... I know I'm not alone when I say that I find it a lil difficult to actually follow through with the idea of parting cash, circa $2k+, for a handbag or pair of shoes. While some girls don't mind starving in the name of Chanel, Celine, Valentino or Jimmy Choo, I would much rather eat and continue to internet window shop, and forever weigh up the pros and cons of such a purchase.
I paid more attention to Valentino while I was researching to find my perfect wedding shoes. I really wanted to buy a pair of shoes that I could definitely wear again, and upon spotting the Valentino Lace Bow couture shoes, I fell in love and had my Mum scouring HK shops to check out the price.

oh boy oh boy oh BOY was I tempted to splurge on the lace bow heels on the left. But, after putting on my sensible hat, I curbed and managed to find the black lace pumps on the right (sans bow unfortunately), from Aldo in Hong Kong. I loved wearing my ridiculously high Aldo heels (5+ inches of ridiculousness to be exact) on my wedding day under layers of organza tulle.
I won't lie and say that I still dream of owning a pair of Valentino bow couture shoes... I may go bonkers and just take the plunge! But hey, a girl's allowed to dream in the meantime :)
.jpg) X
X
When it comes down to going through with purchasing those high-end items that I have lusted after, either from a mag or a blog.... I know I'm not alone when I say that I find it a lil difficult to actually follow through with the idea of parting cash, circa $2k+, for a handbag or pair of shoes. While some girls don't mind starving in the name of Chanel, Celine, Valentino or Jimmy Choo, I would much rather eat and continue to internet window shop, and forever weigh up the pros and cons of such a purchase.
I paid more attention to Valentino while I was researching to find my perfect wedding shoes. I really wanted to buy a pair of shoes that I could definitely wear again, and upon spotting the Valentino Lace Bow couture shoes, I fell in love and had my Mum scouring HK shops to check out the price.

{Valentino Lace Couture Bow Pump v Aldo Black Lace pump}
oh boy oh boy oh BOY was I tempted to splurge on the lace bow heels on the left. But, after putting on my sensible hat, I curbed and managed to find the black lace pumps on the right (sans bow unfortunately), from Aldo in Hong Kong. I loved wearing my ridiculously high Aldo heels (5+ inches of ridiculousness to be exact) on my wedding day under layers of organza tulle.
I won't lie and say that I still dream of owning a pair of Valentino bow couture shoes... I may go bonkers and just take the plunge! But hey, a girl's allowed to dream in the meantime :)
.jpg)
Do any of you have those days where you come home and you just can't be bothered with pots and pans for dinner? Or you have had your dinner and you're feeling a need for sweetness to balance afterwards, but don't want the fuss of scales, measuring cups , whipping and baking?
I tried making this over the weekend... and guess what? it took me 4 minutes to prep and cook. NO KIDDING!

I followed this nicely documented recipe here and served with good Vanilla ice-cream. Just grab your ingredients and go! 2 minute of prep and 1.5 minutes of micro-waving later..... BOOM.
This Nutella mug cake is an easy recipe to remember (tablespoons of self-raising flour, sugar, cocoa, Nutella, vegetable oil, milk and 1 egg - Update: depending on the size of your mug, just fill it with mixture that is about 1/2-3/4 way up the mug). I can SOOOoooo imagine busy Mums (and Dads), those who have had long days at work, lazy folks etc, all giving this a go! I know many girls that would probably eat this for breakfast, lunch and dinner hah!

For other mug recipes, savoury or sweet...served in a mason jar...a glass...or whatever ...see it all collated nicely here!
I don't always condone laziness, but with a busy week ahead at work I can see myself coming home to console myself with a Mug cake or two!

X
March 21, 2013
Postcard from Hyams beach & a lil town called Berry
While we were in Jervis Bay last weekend, we made an arvo trip to Hyams beach (I still have difficulty pronouncing and spelling this...sounds like something rude haha). This beach had the squeakiest whitest sand with beautiful crystal blue waters. I'm now sitting here feeling a bit sad that the days are getting darker, quicker, and the temperatures are getting chillier... for longer.


On our way to Jervis Bay we passed through a town called Berry and thought to ourselves that we definitely should stop off to visit the place on the trip back home. This is quite the quaint little pass-through of a town, and apart from Hunter Valley, Port Douglas and Margaret River, is probably one of Mr Lee and I's first little walk-about in a small Aussie town. So I thought I'd share a few photos from the good ol' smartphone.

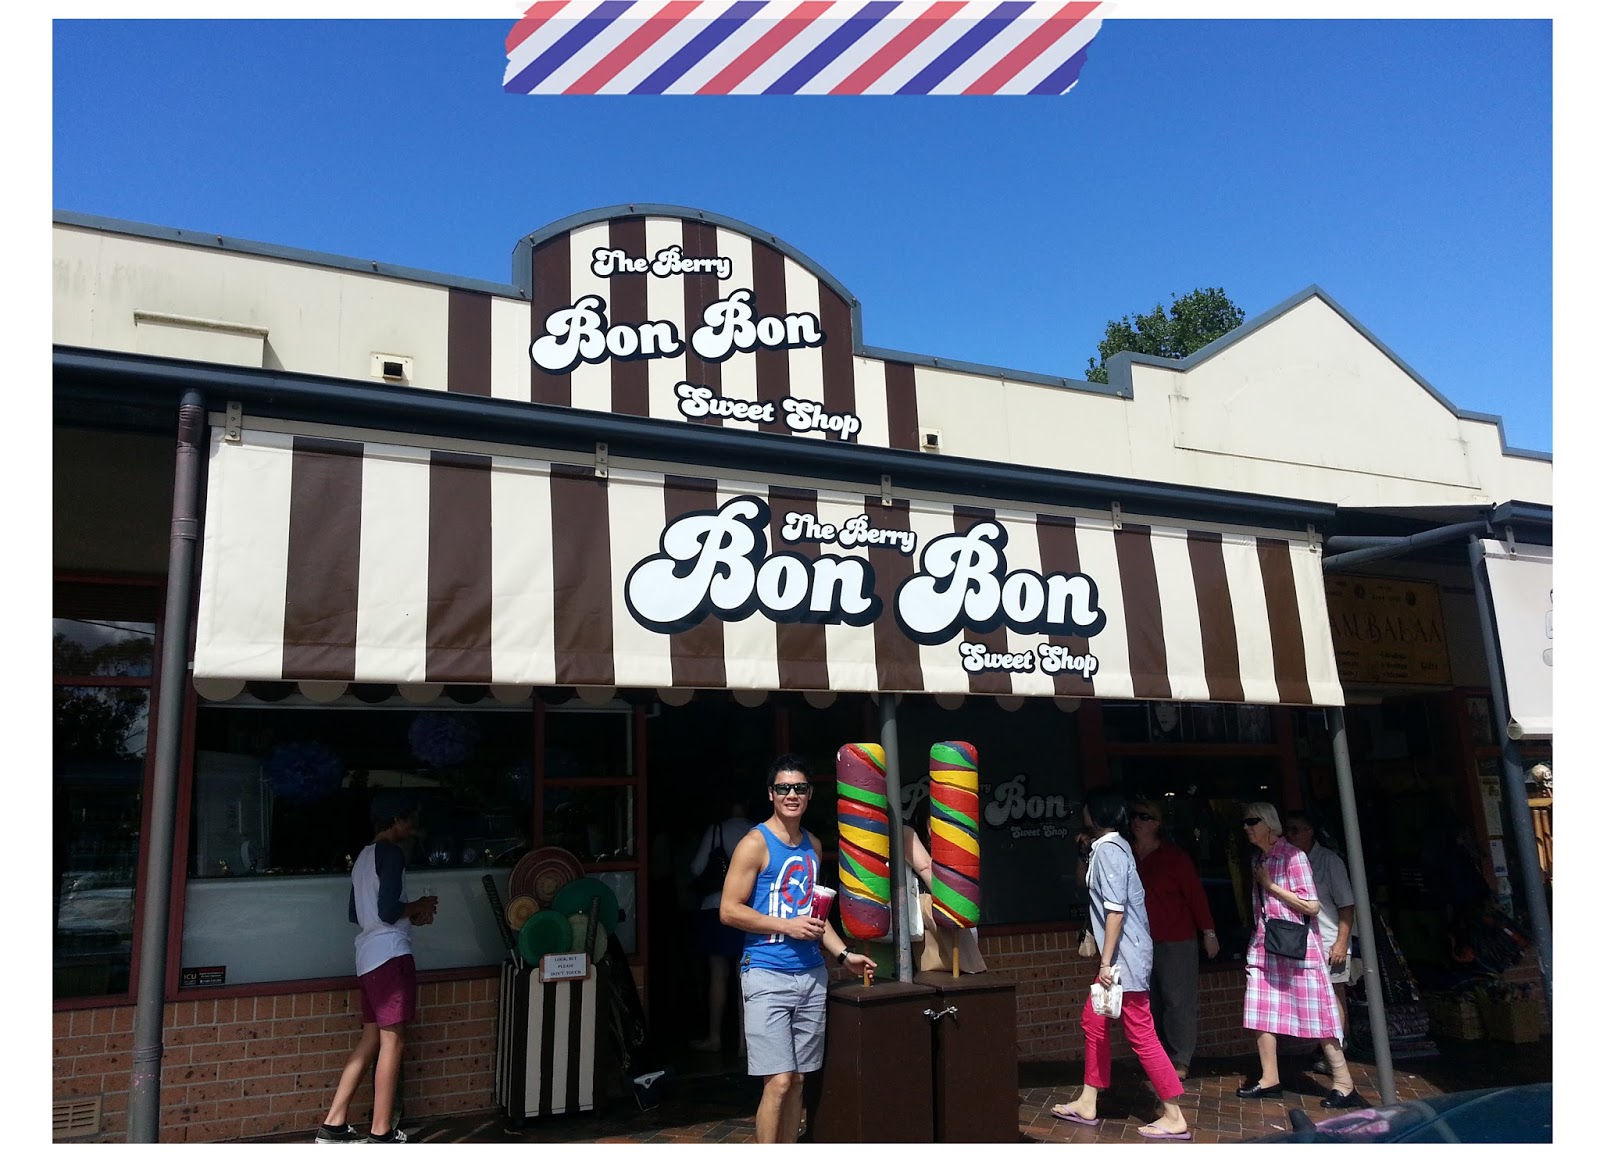
 {Sweets galore. Hello?! Categorised aisles of candy!...ah bless, speaks to my heart}
 {Check out that perfectly shaped thickness of the cake icing!}

The famous Berry Donut shop was a must visit. It delivered quite the treat with a lovely crunchy sugar cinnamon exterior, with a melt-in-your-mouth interior. One of my friends said they used to be even better back in the day, but I still loved it...forfeiting half my hot-dog lunch to try the Donut first, before it went cold :)
 {Look how happy he is to stand outside this van}


X
{A bit of a fright there from the cold water... was only cold for 2 seconds :)}
On our way to Jervis Bay we passed through a town called Berry and thought to ourselves that we definitely should stop off to visit the place on the trip back home. This is quite the quaint little pass-through of a town, and apart from Hunter Valley, Port Douglas and Margaret River, is probably one of Mr Lee and I's first little walk-about in a small Aussie town. So I thought I'd share a few photos from the good ol' smartphone.
{Beautiful gift shops and stores with lovely shop fronts lined the streets}
{The coolest tea and cake shop with oodles of tea and tea party goodies}

{Loving the Mr T portrait on the Tea & Cake themed wall!}
{And of course a bit of crafty shopping along the way}
Mr Alexander Berry was quite the voyager and hero, bringing provisions to Fiji, NZ and Australia, whilst rescuing a few survivors of battles. He and his family became quite prominent landowners around NSW too. With so many little pit stop shops along the streets, it's no wonder so many people pull over to take a gander. I hear rumours that an overpass will be built to relieve the build up of traffic that passes through this town. If this threatens the shops that line the streets, that would be a real shame.
Hope to share some more travel-ly type posts in the future!March 18, 2013
Giant Oatmeal, Raisin & Choc-chip cookie sandwich
This is no ordinary cookie sandwich!
 Last week, before we headed off to Jervis Bay to celebrate a friend's 30th birthday (this weekend just been), I asked my friend what we had to bring. He only mentioned a few things but cheekily included that some sort of baking was something to add to the list. So I thought that's fine, I'll just bake a brownie or a batch of cookies...something easy to take. But then I had a second thought. You know what? If he wants baked goods, and he has such a sweet tooth, I'll present him with a motherload of baked goods. A giant wad of it....in the form of a cookie :) A gigantimo cookie sandwich in fact.
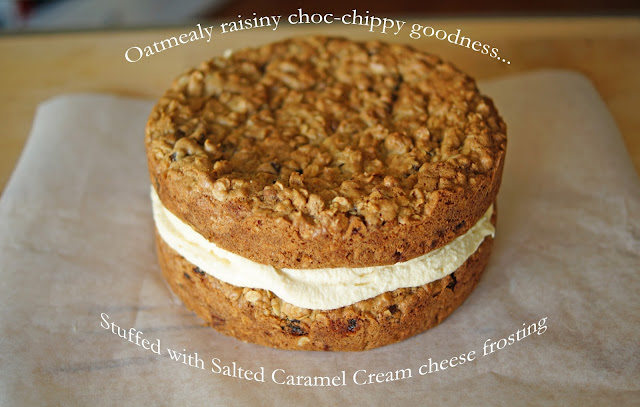
Giant Oatmeal, Raisin & Chocolate Chip cookie sandwich filled with Salted Caramel Cream cheese frosting
I think I just about died when I licked the frosting, it was THAT good!


 Wooo... looks a bit like the middle of a Cadbury Creme egg ;)
I guess this cookie sandwich turned out to look more like a cake. I thought about doing just a plain chocolate chip...but wanted a cookie that had more wholesome oomph! For the cookie recipe itself, I followed this recipe using two 8" round cake pans, but used half cup of dark chocolate chips and half cup of milk chocolate chips instead of the 1 cup of walnuts.


MMmmm....soak in all the 8" diameter X 5" height of this monster

 Whilst I did realise this was going to add to everyone's waist line over the weekend... we were only sharing a slice each in the name of a milestone celebration!
Or maybe it was more of demolishing :)


Giant Oatmeal, Raisin & Chocolate Chip cookie sandwich filled with Salted Caramel Cream cheese frosting


I guess this cookie sandwich turned out to look more like a cake. I thought about doing just a plain chocolate chip...but wanted a cookie that had more wholesome oomph! For the cookie recipe itself, I followed this recipe using two 8" round cake pans, but used half cup of dark chocolate chips and half cup of milk chocolate chips instead of the 1 cup of walnuts.


Salted Caramel Cream Cheese Frosting Recipe
Ingredients:
Salted Caramel Sauce
- 75gm Unsalted butter
- 50gm Light brown sugar
- 50gm Caster sugar
- 50gm Golden syrup
- 125ml Thickened Cream / Double cream
- 1/2 - 1 tsp Fleur de Sel (depending on your taste)
- 170gm Unsalted butter (Softened / Room Temp)
- 230gm Philadelphia Cream cheese (Room temp)
- 1 tsp of Good Vanilla Extract
- 2 cups of Icing sugar - Sifted
Steps:
1. Prepare the Salted
Caramel Sauce first. Place the butter, light brown sugar, caster sugar &
golden syrup in a small saucepan and melt together over a low heat for 3 mins
(swirling the mixture in the saucepan)
2. Once 3 mins is up,
pour in the cream and Fleur de Sel and let this bubble away for a minute or 2
(mix the liquids together with a wooden spoon if the mixture is not combining)
3. Set aside to cool.
This sauce will thicken up more while cooling.
4. For the Cream Cheese
Frosting. Beat the Unsalted Butter and Cream cheese together
5. Whip in the Vanilla
extract
6. Slowly add in the
sifted icing sugar while you keep whipping the cream cheese mixture
7. Now slowly add in
your cooled Salted Caramel Sauce.
8. Refrigerate the
Salted Caramel Cream Cheese frosting for an hr or so before use.

Or maybe it was more of demolishing :)

{Last pic was on the fly from my phone :)}
X
March 13, 2013
MLP loves you x 100 giveaway - CLOSED
I love gift giving as much as receiving gifts myself. One of the little goals I kept to myself was that when I reach 100 likes for my blog, I will definitely show my appreciation. So here we go peeps, a giveaway for reaching 100 likes ... and more!
As I would have said on my Facebook page, the "rules" of the main giveaway are simple:


As I would have said on my Facebook page, the "rules" of the main giveaway are simple:
- You must be a "liker" of my Facebook page "Mia Loves Pretty"
- "Share" my Facebook post about this giveaway (titled "MLP loves you x 100") on your timeline, so that I can see you have entered this giveaway
First draw: Zumbarons recipe book by Adriano Zumbo

Adriano is one of my favourite pastry chefs! With this book, you can create macarons with crazy and exciting flavours like:

and other nommy flavours to boot like this:

Second draw: 3x Kate Moss for Rimmel lippies


These lippies are from the Kate Moss for Rimmel Spring collection, and aside from MAC lippies, are my definite fave. Beautiful colours, moisturising and amazing pay off on the lips. From left to right, #12 is a bright coral red, #20 is a magenta pink and #03 is a beautiful nude.
Third draw: Polka dot pocket square

Something for the gents, a polka dot square with red stitching, similar to the one above.
2x half dozen cupcake giveaway for Sydney-siders
For all you Sydney-siders, I have a separate giveaway in collab with Ana from She Makes Cake. Ana has agreed to make me 2 special flavour cupcakes of my choosing to giveaway to 2 lucky Sydney-siders. I'll be giving away half a dozen of:
- Pink Velvet (Red Velvet cupcake in a prettier shade of Pink) and,
- Peach mudcake (White Chocolate mud cupcake w/ Peach coloured icing)
Rules for this one are similar:
- You must be a "liker" of my Facebook page "Mia Loves Pretty"
- "Share" my Facebook post about this giveaway (titled "MLP loves you x 100") on your timeline, so that I can see you have entered this giveaway,
- Reside in Sydney, AND
- You must also be a liker of "She Makes Cake" on Facebook.
Come on...you will like her, she is funny, loves pretty things like I do... I mean hello...check out these Red Velvet babies of hers as an example!

I'll be using Random.org to draw up the winners on April 3rd April 1st :) Soon after I'll be in touch via FB to get address details! Good luck guys, and thanks again for your support!
Love dove X
Update:
This giveaway contest has now closed
Update:
This giveaway contest has now closed
March 12, 2013
Homemade Honey & Quinoa Granola


Every time Mr Lee and I walk down the cereal aisle of the supermarket, I always pull a face and prefer to just trust good ol' Hi-Bran Weetbix or go off and get some nice dark rye bread for morning vegemite & butter toasts. When the boxed breakfast varieties look un-enticing, the classics are always the best for workday breakfasts, quick and easy. Fancy boxed cereal these days seem a bit blah and not as wholesome as I would prefer. Toasting your own cereal however is easy as pie and much MUCH better than the run of the mill store-bought variety.
Homemade Honey & Quinoa Granola
- 3 tbsp Maple syrup, 5 tbsp NZ Manuka honey (I used a mixture of Active UMF5+ Manuka and Arataki honey), 3 tbsp Rice Bran Oil (you can use Peanut or Sunflower, I just used Rice Bran for the vitamins!). Combine these liquids in a saucepan over a low-heat until just mixed through to a beautiful golden emulsion.
- 150gm Tri-coloured Organic Quinoa
- 480gm Rolled Oats
- 120gm White Sesame Seeds
- 150gm Raw Cashew nuts
- 200gm Raw Almonds
- 250gm Apple Sauce
- 2tsp Ground Cinnamon
- 1 tsp Ground Ginger
- 280gm Raisins
- Preheat oven to bake at 160 degrees Celsius
- Mix all ingredients, except the raisins, together and divide the mixture among two baking trays. Spread out the mixture to a nice even flat layer with a few loose clumps here and there.
- Place in the oven to bake for 1 hour or so.
- Halfway through toasting, turn the mixture over. You're aiming for a golden brown, not too toasty brown. Remember the granola mixture still keeps cooking a lil when you take it out of the oven.
- Once golden and toasty, take out of the oven and leave to cool. Later, mix in the raisins. Store in an airtight container for up to 2 weeks.


X
For those that know me or have followed me on Instagram, you will know by now that I'm a bit of a social media and camera ho, ahem , junkie, I mean social media and photo taking enthusiast. Mr Lee thinks that my phone is engrained in my brain. But I can't help it. I chat a lot, and share a lot, and I like to be in the know... that's just who I am!
Early this year I transitioned from being primarily an apple user, to being an android user. Though I still maintain a connection with the apple world through my iPad mini, I was weary of what apps the android world could offer me. What was the equivalent of afterglow? Pic collage? Omg!
This weekend just been, I was honoured to not only be a part of my good friend's wedding, but I also got the opportunity to do makeup for the MOB and MOG (mothers of the bride and groom, for those of you thinking I did makeup on a gangster and a cat). You should've seen me... Making up, hairstyling, and running around doing bridesmaidly duties, whilst Instagram-ming and wedding party app uploading. At one point I was sitting in the makeup chair with the bride's phone as well as mine in hand, answering calls and uploading photos in the other. Being so on the go couldn't have been possible without the help of some of my fave photo apps.
So here are my frequently used apps on my phone / iPad... that lets me update and share in a breeze so that I can enjoy other things "in the moment":
Pixlr Express
After being so used to using the Afterglow app on my iPhone, I found this app was not only great for using various filters, more than what is available on Instagram, but it also works likes a fast-using Adobe photoshop. Crop, brighten, saturate and even text overlay until your heart's content!
Available for the iPhone and Android phones! And bonus thing is that it's free!
Photogrid
Ever taken a pic on your normal phone camera, only to find that it doesn't fit the Instagram frame, so you get forced to choose to cut out a good portion of your original pic? Photogrid is perfect to not only help you collage multiple photos, choose various borders and text overlay, but it resizes singular photos with various cool Polaroid-like borders into the perfect Instagrammable square :)
Here, I turned this photo which was too wide for Instagram


Evernote
A lil before starting this blog, I was jotting down ideas in cute little paper notebooks, but what a difference Evernote has made with enabling me to save links, save photos, write notes, edit text and collating all these things into one "note". It even lets you save audio notes. Mr Lee had downloaded Evernote for me to use for our wedding planning... I so should have paid more attention instead of having several folders on my laptop!
Available on both Android and Apple
Wedding party
Over the weekend, me and the other bridesmaids fully utilised this app to upload and share wedding prep pics, and it also allowed all guests to upload photos that they were taking, straight from their phones. This is especially great for the wedding couple that would like to keep all wedding photos in one single application before a mass facebook upload.
Available on both Android and Apple... And did I mention free?

Blog Go
A recent app that has assisted me in my on the go life, is BlogGo. I first stumbled upon Dana's website via Zoella when I was blog trawling like I normally do....
This app isn't yet available for androids, but I'm pretty sure it will be in the future

X
Subscribe to:
Posts (Atom)