Hairstyling
If you either:
The good peeps at Ry.com.au sent through a beaute little package which contained this cute wee thing.


I couldn't believe how cute this little hairdryer was. Its like my hairdryer delivered a baby! At 1200 watts, the BaByliss Pro Bambino 5510 is just over half the wattage power of my current hairdryer (a Phillips 2300W Pro hairdryer), so you would assume it has less gale force power of normal hairdryers, but don't let its size fool you, this little thing has a bit of pep!
On the box, the brand boasts that this hairdryer contains nano-titanium technology that helps smooth the hair shaft for shiny locks. The hairdryer came with a concentrator nozzle and a diffuser. It is the cutest diffuser ever, and now I wished all hairdryers came with a diffuser (my Phillips normal sized hair dryer did not!).

 There are only 2 simple power settings, low and high heat/speed, and I think the whole point of this little baby is that it is a breeze to use and travel with.
I took the Bambino away with me on a weekend in Bowral and it was just so light in my bag. I blow dried my hair a couple of times whilst I was away with my hair flipped upside down, and it was all dry with a good boost of volume within about 15 minutes. However, I think this may have only seemed great to me as I have short bob-length hair. I haven't yet tried it on long hair, but I'd have to say this is the sticking point that would probably frustrate a few people. On the other hand, the machine is so lightweight its great if your biggest problem is having trouble wielding a big dryer over and around the head or simply getting sore arms from blow-drying your hair!
A couple things I had hoped was that the dryer had a fold-able handle and also a cold shot button. But at $AUD45, this is a minor 'con' for a mini hairdryer that does pack a punch for its size. Perhaps the Pro version; BaByliss Pro Torino addresses all these needs while giving more power and maintaining a smallish shape?
Anyways I've used the Bambino quite a few times over 3 weeks now and I have jotted down a quick pros and cons list of my thoughts below. For reference, my hair is bob length (just above the shoulders, see here) and without aid, it would normally dry dead straight. I'm talking poker straight. All the hair around the crown of my head usually stays really flush to my scalp, so I normally need to use a volumising spray (my favourite is the Christophe Robin Volumizing Mist Spray!) and dry my hair upside down or use a round brush to add volume around the crown and front.
Pros
All in all, I think mobile artists and short haired girls would love this little pocket rocket for sure. It's pretty handy and delivers results rather quickly for its size! I've even used it a few times to dry Bailey after bathing him and it doesn't take me any longer than it normally would with my Phillips hairdryer! I'll be packing this in my mobile kit and taking it again on any future vacays!
- Get sore arms when blow-drying your hair,
- Hate packing your big a*s hairdryer in your suitcase when you're travelling,
- Looking for a low cost alternative to a good hairdryer, or
- All of the above
The good peeps at Ry.com.au sent through a beaute little package which contained this cute wee thing.
I couldn't believe how cute this little hairdryer was. Its like my hairdryer delivered a baby! At 1200 watts, the BaByliss Pro Bambino 5510 is just over half the wattage power of my current hairdryer (a Phillips 2300W Pro hairdryer), so you would assume it has less gale force power of normal hairdryers, but don't let its size fool you, this little thing has a bit of pep!
On the box, the brand boasts that this hairdryer contains nano-titanium technology that helps smooth the hair shaft for shiny locks. The hairdryer came with a concentrator nozzle and a diffuser. It is the cutest diffuser ever, and now I wished all hairdryers came with a diffuser (my Phillips normal sized hair dryer did not!).
I took the Bambino away with me on a weekend in Bowral and it was just so light in my bag. I blow dried my hair a couple of times whilst I was away with my hair flipped upside down, and it was all dry with a good boost of volume within about 15 minutes. However, I think this may have only seemed great to me as I have short bob-length hair. I haven't yet tried it on long hair, but I'd have to say this is the sticking point that would probably frustrate a few people. On the other hand, the machine is so lightweight its great if your biggest problem is having trouble wielding a big dryer over and around the head or simply getting sore arms from blow-drying your hair!
A couple things I had hoped was that the dryer had a fold-able handle and also a cold shot button. But at $AUD45, this is a minor 'con' for a mini hairdryer that does pack a punch for its size. Perhaps the Pro version; BaByliss Pro Torino addresses all these needs while giving more power and maintaining a smallish shape?
Anyways I've used the Bambino quite a few times over 3 weeks now and I have jotted down a quick pros and cons list of my thoughts below. For reference, my hair is bob length (just above the shoulders, see here) and without aid, it would normally dry dead straight. I'm talking poker straight. All the hair around the crown of my head usually stays really flush to my scalp, so I normally need to use a volumising spray (my favourite is the Christophe Robin Volumizing Mist Spray!) and dry my hair upside down or use a round brush to add volume around the crown and front.
Pros
- Came with a diffuser attachment
- Long 1.8m cord length
- Light and super travel friendly
- Great price, only $45!
- Smaller than my most hairdryers, by far!
- Great for mobile jobs, especially from a small handed person point of view
- I've always struggled with getting tired arms whilst round brush blow drying my own hair using a normal sized hairdryer. With the Bambino though, I found there was no need to rest in between round brushing sections like I normally would. Hurrah! I can pivot the Bambino in all sorts of directions without blocking my view in the mirror, resulting in a quicker job.
- A good lifted look can still be achieved with a round brush despite it's lower wattage
- Great for creating flicks and curls at the ends of your hair
- The handle does not collapse to make the dryer even more compact
- Can't imagine it doing a super quick job for ultra long and/or thick hair.
- Attachments get super hot, so you'd have to wait a bit for them to cool down before detaching or changing out the attachments.
- Probably could cause some heat damage if you don't move quickly. I found I couldn't have the hairdryer shooting in one direction for too long on the highest setting, otherwise I'd get a hot spot sensation.
- No cold shot option
- No heatproof pouch
All in all, I think mobile artists and short haired girls would love this little pocket rocket for sure. It's pretty handy and delivers results rather quickly for its size! I've even used it a few times to dry Bailey after bathing him and it doesn't take me any longer than it normally would with my Phillips hairdryer! I'll be packing this in my mobile kit and taking it again on any future vacays!


January 20, 2014
Cobalt Dreams
When I bought this top I was too in love with the colour to really consider how the length of the top would make me look a bit stumpy. I mean , hello... it's long enough to be a dress on me, how did I miss that?!
But anyways, I figured if I pile all my hair on top , and stack on some heels, then this would add about 8 inches to my otherwise 5'4" frame :)


July 23, 2013
Faux Bob Faux Leather


The weather over the weekend was like a peek of spring, and I think it's time for a change!


Zara Faux Leather Peplum top (similar here and here) / H&M Pants (also seen here) / Tru Trussardi Sunglasses (also seen here, and here) / ASOS strappy heels (on sale!) / Faux snakeskin clutch (purchase on holiday in Thailand)


X
July 02, 2013
Classic chignons with extra twist of detail

The photo above is of my handy work on my good friend Marissa. As the wedding season is hitting the northern summer, the wedding industry is going nuts and brimming with inspiration, so I'm absolutely loving all the excitement around the interwebs. I've always been a fan of a classic chignon, and while I didn't rock it for my special day, I certainly appreciate the style and look on other fabulous ladies.
Here's a small selection of some chignon up-do inspiration for those that love the classic chignon look but want a point of difference, a twist of detail :).


6. Jennifer Lawrence's 2013 Oscars look via People Style Watch / 7. via Glamour (also includes a tutorial!) / 8. via Style Me Pretty (the bride wore this with a bird cage veil!) / 9. via People Style Watch
Also see a previous post showing low loose chignon inspired do here! and also here!
Diane Kruger has sported a tonne of polished chignon up-dos, I think she deserves an entirely separate post altogether!
X
June 22, 2013
Crown Braids
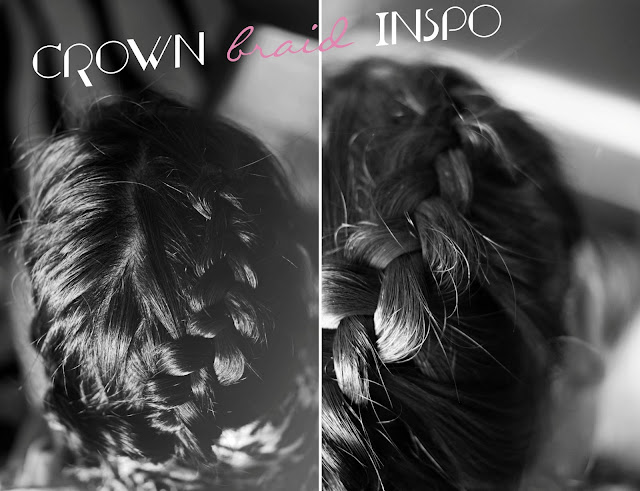

{LARGE DUTCH BRAID all around the perimeter of my head :) Beautifully plaited by my fave hairdresser; Rachel from Muse here in Sydney}

HALF UP via Hair Romance / SIDE LOOSE FRENCH PLAIT via Love Maegan / FRENCH PLAIT AT HAIRLINE via The Knot

MULTIPLE BRAIDS via Style Me Pretty / SIDE DO WITH SCATTERED BRAIDS via Blovedweddings / SIMPLE DUAL BRAIDS WITH BEEHIVE via KeikoLynn

LARGE LOOSE BRAID via OnceWed / WATERFALL BRAID via OnceWed / HALO BRAID via Wedding Chicks - (All wonderful tutorials!!)
Also here's a little girl inspo :)
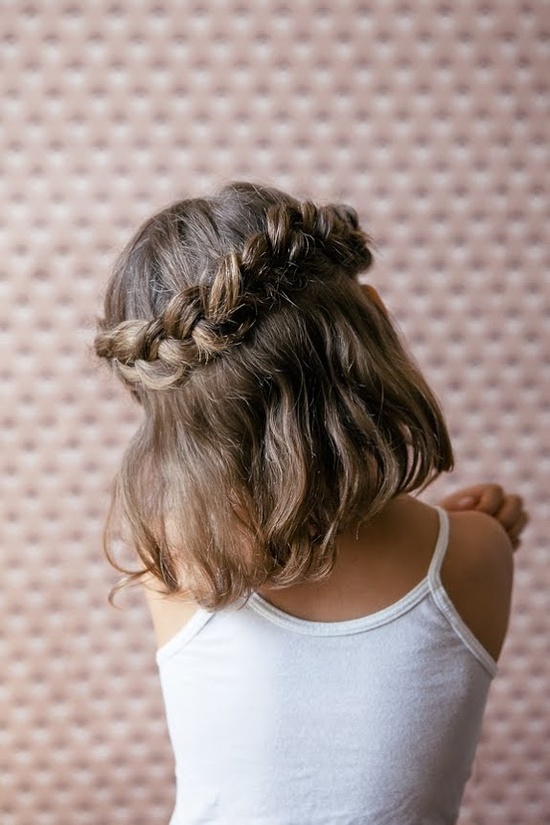
Cutie little girl Crown Braid hair inspo via CUP OF JO
X
May 19, 2013
Messy but chic hair updos on lazy and free weekends
After a long work week, it's sometimes a bit of stretch to put effort into creating nice hair-dos, when all you want to do is be lazy, sleep in, go for walks or brunch, the movies ... or basically not do too much.
I'm normally a quick messy top knot type of girl when it comes to tying up my hair. But here's a messy hair up-do look that just makes you look styled without trying too hard. It only took me 10 minutes with the help of:


Sorry I couldn't take any pics of me braiding, it's already hard as it is with having dark hair! If you're not used to braiding, practice really does make perfect. I couldn't French or Dutch braid for the life of me until I learned to be a bit patient with it. Here is a nice and easy-to-follow Youtube tutorial to help you learn how to Dutch braid ... then after practice you can be braiding backwards like nobody's business. Braiding "blind" is challenging, but trust your fingers and intuition.
All you ladies with beautiful highlighted hair will showcase more of a braid. If your arms don't get too sore, you can try braiding smaller sections of hair to showcase an even more intricate looking braid.

Stay effortless chic ladies :)
X
I'm normally a quick messy top knot type of girl when it comes to tying up my hair. But here's a messy hair up-do look that just makes you look styled without trying too hard. It only took me 10 minutes with the help of:
- A few hairpins and bobby pins
- A comb
- A couple of hair-ties
- Spray wax to help comb back any flyaways and smooth back the front part of your hair.
- (Curling tongs if you have Asian hair / hair that has a lot of flyaways)
- Section just over 1/3 of your hair (from the top of your ear lobes up) off to a quick top knot in the front and if you have Asian hair like me, curl the bottom half of your un-tied hair into loose curls (this helps prevent any flyaway hair popping out of your braid).
- Flip your head forward and start braiding from the nape of your neck until all hair is gathered up into a braid. Keep plaiting till the end of the braid and secure the end of the braid with a hair-tie
- Release the top knot and smooth back (with the aid of your comb and a bit of spray wax) into a tighter ponytail. Use your comb and tease the ponytail in various 1" sections
- Now gather all your teased sections and shape into a rough ballerina bun (doesn't have to be a perfect dome!)
- Release the hair-tie from your braid, tease the whole end of it and secure it into your ballerina bun however way you like.
{Do ya like how my laundry basket made an appearance? lol}
Sorry I couldn't take any pics of me braiding, it's already hard as it is with having dark hair! If you're not used to braiding, practice really does make perfect. I couldn't French or Dutch braid for the life of me until I learned to be a bit patient with it. Here is a nice and easy-to-follow Youtube tutorial to help you learn how to Dutch braid ... then after practice you can be braiding backwards like nobody's business. Braiding "blind" is challenging, but trust your fingers and intuition.
All you ladies with beautiful highlighted hair will showcase more of a braid. If your arms don't get too sore, you can try braiding smaller sections of hair to showcase an even more intricate looking braid.
Stay effortless chic ladies :)
X
April 22, 2013
Easy and loose Hollywood curls
Whenever its Oscars or Emmy award time... I just LOVE ooh-ing, aah-ing and uh-oh-ing at the red carpet arrivals. One particular favourite of mine this year was Reese Witherspoon's Oscar hair. Gorgeous, Hollywood Glam and retro curls.

A lil while back I dusted off my hairstyling finger tips (and my makeup brushes for that matter... see the post here), and played around with my good friend's hair. Isn't it a girly thing to do so? I can't shake this off no matter how much older I'm getting!
Hollywood hair a la Rita Hayworth style is one of my favourites styles. But sometimes when you wanna look your best and polished, but not too overdone or not too Hollywood glamour (depending on the theme of the night), you just need to take these hair inspirations and try variations of these hairstyles. Here's my take on a looser version of the Hollywood curl that is quick and easy.
I sprayed my friend's hair with heat protectant spray (I used Tony & Guy). Then sectioned her hair in half horizontally (the halfway line reaching from air to air), and then in half again vertically (the vertical half line from a slightly deep side part that ran down the back of her head).
Leaving an inch of her bangs clipped aside in the front, I curled the rest of my friend's sectioned hair (1-1.5" slices at a time) with a 1.5" curling iron all in the same direction (for this, I curled her hair towards the right side of her head). Once each slice was curled, I kept it in a rolled up shape, by rolling them around my fingers to make a pinned curl that was 4-fingers wide, sprayed with a little L'oreal Elnett hair spray......and let the rolled up curls cool on her head while I did her makeup.

For the front bangs that I clipped aside, I curled this away from her face and pinned the curl on top of her head.
Once all the curls were cooled, I let all the pins out and loosely brushed through her curls to create volume and loosen the curls. Created a slight deep side part and swept all her hair to one side. Pinned a few inch bottom layers of her hair towards the right and at the nape of her neck, so that the hair would stay in that direction.

Then basically toyed around with the brushed out curls, either try a voluminous look by combing the curls through more, or a slightly more uniform curl look by shaping with your fingers. And then do a final spray of L'oreal Elnett to finish and set!

And here's a few closeup makeup shots :)

 I promise she does smile!

X
A lil while back I dusted off my hairstyling finger tips (and my makeup brushes for that matter... see the post here), and played around with my good friend's hair. Isn't it a girly thing to do so? I can't shake this off no matter how much older I'm getting!
Hollywood hair a la Rita Hayworth style is one of my favourites styles. But sometimes when you wanna look your best and polished, but not too overdone or not too Hollywood glamour (depending on the theme of the night), you just need to take these hair inspirations and try variations of these hairstyles. Here's my take on a looser version of the Hollywood curl that is quick and easy.
I sprayed my friend's hair with heat protectant spray (I used Tony & Guy). Then sectioned her hair in half horizontally (the halfway line reaching from air to air), and then in half again vertically (the vertical half line from a slightly deep side part that ran down the back of her head).
Leaving an inch of her bangs clipped aside in the front, I curled the rest of my friend's sectioned hair (1-1.5" slices at a time) with a 1.5" curling iron all in the same direction (for this, I curled her hair towards the right side of her head). Once each slice was curled, I kept it in a rolled up shape, by rolling them around my fingers to make a pinned curl that was 4-fingers wide, sprayed with a little L'oreal Elnett hair spray......and let the rolled up curls cool on her head while I did her makeup.
Once all the curls were cooled, I let all the pins out and loosely brushed through her curls to create volume and loosen the curls. Created a slight deep side part and swept all her hair to one side. Pinned a few inch bottom layers of her hair towards the right and at the nape of her neck, so that the hair would stay in that direction.
Then basically toyed around with the brushed out curls, either try a voluminous look by combing the curls through more, or a slightly more uniform curl look by shaping with your fingers. And then do a final spray of L'oreal Elnett to finish and set!
And here's a few closeup makeup shots :)
X
April 18, 2013
Flower crowns for your hair
Some would think flower crowns are typically reserved for flower girls when it comes to weddings.

And as cute as they can be, the limitation to just flower girls wearing flower crowns is so not the case! I have long admired ladies that can pull off wearing amazing flower crowns. Would you wear a flower crown for your wedding or any special occasion for that matter? Here is an inspirational round-up of beautiful flower crowns and wreaths for all types of hair and styles.


And as cute as they can be, the limitation to just flower girls wearing flower crowns is so not the case! I have long admired ladies that can pull off wearing amazing flower crowns. Would you wear a flower crown for your wedding or any special occasion for that matter? Here is an inspirational round-up of beautiful flower crowns and wreaths for all types of hair and styles.
Source credits, clockwise from top left: HERE / HERE / HERE / HERE {Love this girl; Amber! Please do check out her blog!}/ HERE / HERE / HERE

I know I know... a little crazy to wreath a dog... but come on...look how cute this liddle one is, I couldn't resist :)
 (found via Pinterest)

X
Subscribe to:
Posts (Atom)


